
![]() I know I have been incredibly quiet on our blog so far this year, but there had been a reason for that…. I had been incredibly busy studying for an NCFE qualification in Photography. Also you may have noticed that I have been joined by another contributor who has been recently posting on the blog. It is of course my wife Kim (kimsideas) who has been blogging about her Mary Berry Baking Challenge and I hope everyone has been enjoying reading her postings and just maybe, you have been having a go yourself at baking some of her posts.
I know I have been incredibly quiet on our blog so far this year, but there had been a reason for that…. I had been incredibly busy studying for an NCFE qualification in Photography. Also you may have noticed that I have been joined by another contributor who has been recently posting on the blog. It is of course my wife Kim (kimsideas) who has been blogging about her Mary Berry Baking Challenge and I hope everyone has been enjoying reading her postings and just maybe, you have been having a go yourself at baking some of her posts.
So back to my course…. The course started in September 2011 at the Adult Education centre in Brampton Road, Bexleyheath. After attending each Saturday morning for 3 hours, and quite a lot of homework, I finally completed the course in May 2012 and am very pleased to report that I did in fact manage to pass!!!
Does this mean I’m a better photographer now? Well to be honest I don’t think that’s for me to say, although I will say that my post production workflow has definitely benefited from the course.
As far as I can tell, the NCFE Photography courses are available in level 1 and level 2 only. I have completed the level 1 course and was going to start the level 2 course about now, but sadly this will now have to wait till next September now.
So what is NCFE? Well please visit the following link which explains who NCFE are and how they are recognised – http://www.ncfe.org.uk/AboutNCFE.aspx
The course covers all aspects of photography from the functions on your d-SLR camera and how it works, to image framing and composition and then moves onto the final aspect which is post production and photo editing within Adobe Photoshop.
I think some of the students on my course thought this was going to be a simple attend 3 hours a week and not much else. Nothing could be further from the truth!!! Not only did you have some projects to shoot, normally submitting 12 images per subject matter, but there was an awful lot of typing up to do by creating notes in an Evidence Folder which would demonstrate not only what you learnt, but also how you learnt it.
The very final stage of the course was the final Portfolio which had to fulfill some quite open subject matters…
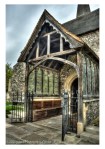
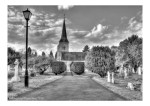
I chose “Spirit of the Place” and therefore chose to photograph churches, taking 7 interior images and 7 exterior images.
-
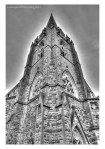
- Clock Tower – St George’s Church, Bickley
-
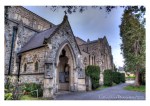
- Entrance – St George’s Church, Bickley
-
- Gated Entrance – St Nicholas Church, Chislehurst
-
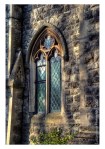
- Church Window – Christ Church, Chislehurst
-
- Follow the Path – St Nicholas Church, Chislehurst
-

- Side Door – St Nicholas Church, Chislehurst
-

- Stone Arch – St George’s Church, Bickley
-

- Church Corridor – Bromley Parish Church
-
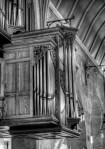
- Organ Pipes – Bromley Parish Church
-
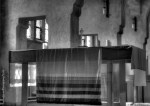
- Alter – Bromley Parish Church
-
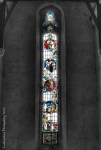
- Stained Glass Window – Bromley Parish Church
-
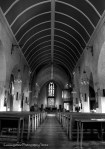
- Church Interior – Bromley Parish Church
-
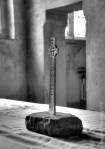
- Stone Mounted Cross – Bromley Parish Church
-
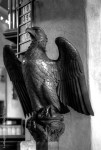
- Wooden Eagle Lectern – Bromley Parish Church
Although this wasn’t covered in the course, I chose to demonstrate some of the skills I had by creating HDR (High Dynamic Range) images. This consisted of taking 7 seperately exposed images all in RAW format and then combining them using Photomatix and Photoshop to create a single image.
Even if I say so myself, I think some of the results were absolutely amazing!!!! Ok it’s fair to say that i spent days on each image to try and make sure it met my perception of being “correct”. In hindsight, I probably took far too long over the editing.


